Monday, April 22, 2013

Pineapple Chicha

I like to use 'stuff' that normally gets thrown away.   I especially like to use 'stuff' that ends up tasting yummy.  And to take it a step further, using scraps and wild food  to make any sort of alcohol, is sort of a win-win in the kitchen.  But one of the best things about this recipe is that it's also delicious in it's non-alcoholic form.


If you decide to ferment this recipe, you'll need to make the apple cider starter for hard apple cider that I wrote about in my in my last blog.  The starter is so versatile, I keep it on hand all the time.  I keep it in the fridge and when I need it, just set it out at room temperature for a day to let the yeasts 'wake up' and start working again.

If you decide to leave it non-alcoholic, then omit the fermentation and just drink it hot or chilled.

We eat pineapple a couple of times of year, mostly during the holidays.  It's sort of an expensive treat but the family loves ambrosia and I hate to say 'no'.  But I'm left with a lot of peelings and the core, which always seemed such a waste.

And then I discovered 'Chicha'.  I'll admit it, the first thing that comes to mind when someone says 'Chicha' is an old Andean Grandmother, chewing up corn and spitting it back in to the brew pot.  Not a terribly appetizing idea for a beer for many reasons, not the least of which is the idea of that whole 'communicable disease' thing.

But the more I researched Chicha the more I found out it doesn't always involve spit.  It also doesn't always involve blue corn.  Chicha can be made with rice, pineapple, cassava, amaranth, peanuts, barley, cannabis, pineapple and more.  And it doesn't actually have to ferment.  Unfermented pineapple Chicha is a treat often served to children.  And if you try it, you'll see why.  It's delicious.  Personally, I think the unfermented version would make a great fireside drink with a dash of rum...

You'll need the peelings and core from a pineapple.
5 quarts of water
1 pound of panela (or brown sugar)
2 handfuls of fermented blackberry tea leaves (see previous blog)
Spices (whatever suits your fancy.  I used ginger, cinnamon, cloves, allspice, but wild spices would be great too)

Throw everything into a pot and simmer for about an hour.
Turn off heat and let sit overnight.  Strain.

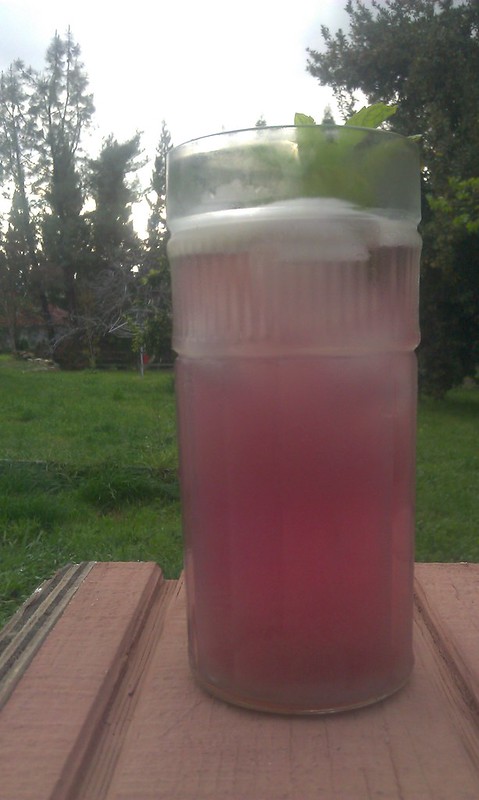
Now you have several options.  You can chill it (it's delicious as is or with a bit of rum), you can heat it up and serve it as a hot drink (again, delicious with a splash of rum), or you can ferment it for a few days and make a very nice spicy beer with an alcohol content of about 3 percent.

To make the beer, just pour the strained liquid into your carboy, add about a cup of the hard apple cider starter (recipe in the previous blog), top it with an airlock and let it sit for a few days.  You can taste it every day to see where on the scale you like it...sweeter or dryer.  The dryer the brew the higher the alcohol content.  If you're doing a lot of brewing, you might want to spend the 15 bucks and get in inexpensive hydrometer.  When it reaches the flavor that you like, bottle it.


And that's all there is too it.  A delicious drink and no waste.


Tuesday, April 16, 2013

Hard Apple Cider


My friends, Deane and Darren, have me making hard apple cider.  There is nothing better on a hot day.  And I can't think of anything else I make in the kitchen that takes less work.  Really.  You peel an apple.  That's it.

Go to the store.  Buy 2 half gallon bottles of apple juice and one organically grown apple.  The juice doesn't have to be expensive, but it can't contain any nitrates or sufides or other preservatives.  Added Vitamin C is fine and it can be pasteurized.   

Open one bottle of juice and pour out about 1 cup.  Peel the apple.  Place the apple peel into the bottle of juice.

There you go.  Most of the work is done.

Now just put the bottle in a nice warm spot (it doesn't have to be all that warm actualy, but it'll take longer), and wait.  Shake the bottle up every day.  After about 3 days, you'll start to see some small bubbles around the peel.  If you open the lid, you might hear a slight 'shwoosh'.   Wait another day. It may take up to 5 days, but the point is, when the bottle gets really hard and every time you open it you get a loud 'swoosh', then your starter is ready.

Now you have a couple of options.  You can pour your second bottle of juice into a carboy, and add a cup of your stater, or you can do it the lazy way (my choice) and pour about a cup of the second bottle of juice out and replace it with one cup of your starter.  At this point, you can put your original starter in the refrigerator and drink it.  It's sweet, fizzy and delightful.  Kids love it and there isn't enough alcohol in it at this point for it to be a concern.

So now you have your first bottle of juice (the starter) tucked away in the 'fridge, and your second bottle in either a.) a carboy with a fermentation lock or b.) still in the original jug that it came from the store in.

Now just wait.  You can use a hygrometer, but I don't.  I like my cider sweet, so I let it ferment for 4-5 days.  Other people like a dryer cider and will let it ferment longer.  Totally up to you.

If you've used the carboy, bottle up your cider when it reaches the stage that you like it.  If you used the lazy woman's way, put it in the fridge. (You'll need to open the top every day to prevent too much gas buildup and making a mess in your refrigerator.)  Then just pour it from the jug.  It wont be quite as fizzy as if you bottled the cider in glass, but her, I hate washing bottles, so I'll put up with a very small amount of less 'fizzyness'.

It's delicious, cold and thirst quenching.  And easy.  Did I mention easy?

Now, wait and see what we can do with any leftover 'starter' in my next blog.


Tuesday, April 9, 2013

Homeness

So, I forage and write this blog for fun.  It's my diversion, my getaway from real life.

I love my life and wouldn't have it any other way...but it's sort of complicated.

I spent a long time in school.  A very long time.  I studied chemistry and biology and genetics and thankfully, a lot of botany.  I ended up with a bunch of degrees and a tittle that I used for awhile, but in the end, it was all sort of a waste.

I'd been living in Montana and had to come back to the 'ancestral home' to care for my mother, who suffers from Alzheimer's.  It's a tough disease, but she is a tougher woman and she has fought the good fight, now she gets to rest and I get to help her. 

I've watched a lot of things being born in my life.  I've watched a lot of things die as well.   Some deaths are hard and make you're heart swell with pain.  Others seem sort of clinical.  But there's always respect and a certain sanctity involved as someone bleeds their  very essence, out to join the rest of the energy of the Universe.

Oh, enough deep thoughts.

I'm fortunate, that even though this is California, I still live in the 'sticks'.  21 acres of pretty much nothing. No cable, still have dial-up, water comes from a well.  There's a bar in town and a post office.  I have to go to another town for groceries.


It's an oak woodland area, with large outcroppings of granite.  Occasionally you find the grinding holes the early people used to grind acorns on the rocks.


I live here with an assortment of animals.

Chickens, ducks and geeses, for meat and eggs:


I only have two dogs, but I care for the neighbors two dogs.  (The neighbors don't believe dogs need to come in at night, get fed on a regular basis, or go to the vet.)  Oh, let's face it.  I guess I have four dogs.


My 'lil sqeeze cheese' Veeta:


Wally, a rescued Catahoula:

And Zeena and Bella (the two freeloaders)
One cat, whose name is uh...'Cat'.
I lost a mare last year, 'Bouncing Betty' to moon-blindness.  That leaves me with two.
Chief the clown:
And 'Emma the Spoiled'

The occasional beef cow, goat or sheep comes through as well, but they are strictly transitory.

For a living, I raise medicinal herbs, but I don't make much money at it.  If you can consider it a job I shill things like laundry detergent and health insurance on television   Yep, I'm a sell-out.  A commercial actress.  Don't hold it against me, a girls' gotta make a living ;)  Yes, it's a long way from the halls of academia, but it works for now.

So that's it.  It's sort of the short hand for what goes on around here.  There's lots of shoveling poop, lots of chores, lot's of laughter, lots of heartache.  But it's a life.

Saturday, April 6, 2013

Wisteria Agua Fresca

The Wisteria (W. sinensis) is blooming around here.  It's one of those plants that you either love or hate.

My dad was one of those that hated the plant.  One vine had grown, uninvited at one corner of our house.  The tendrils slid under the shingles, between the rafters, and slowly began to tear the house apart.  Dad ripped it out, stubbornly it returned.  Dad poisoned it.  The plant came back with a vengeance.  Eventually a five-year war ensued to remove the vine from the skeleton of the house.  For a couple of years, the battle seemed evenly matched,  but finally the plant seemed to acquiesce and disappeared from the yard.   But it was only a clever strategy.  The root sat there for almost twenty years, waiting for it's nemesis to die.  And soon, one morning not long after my father passed, I noticed a snake of a tendril creeping out from that long-dormant root and marching back toward a window casing.

The stuff is tenacious.

An abandoned homestead near me is a solid square of purple in the spring.  The vine has shrouded an Italian Cypress.  It's lovely in spots like this and reminds me of a ghostly plantation.  Long racemes give the appearance of purple icicles dripping to earth.  And the smell, oh my goodness, the smell.  If angels wear perfume, it must come from the wisteria blossom.

The flowers of the Wisteria are edible.  But only the flowers.  The seeds, stems, leaves and bark are all toxic.  Bring the flowers into your kitchen and your house will smell of spring for days.  The problem is, the color of the flowers doesn't hold up in heat.  Eating it in cold preparations or adding it just before serving a hot dish will keep the color nicely.

So the next couple of blogs will be focusing on ways to serve wisteria while maintaining the fragrance and the beautiful color of the flowers.

We drink a lot of agua fresca here in the summer.  It's a light, fruity summer drink that utilizes just about any mixture of fruit and vegetables.   Our summers get hot, and we often have days that max out about 110 degrees.  Cooking anything is a chore.  So an icy cold drink that just involves a whip in the blender is a treat.  Normally, I might use tamarind, cantaloupes  watermelon or even cucumber.  Made with Wisteria, agua fresca takes on a whole new profile, fragrant and sweet-tart.

Whirl 3 cups Wisteria blossoms, 2 cups water, 4 tablespoons lime juice, 3 cups of water, a shot of simple syrup to suit your taste,  and half a cucumber together in a blender.  Strain.  Serve over ice with a sprig of mint.

Now, sit back on a chaise lounge and enjoy.

Wednesday, April 3, 2013

Prickly Pear Pie

Prickly pear cactus grow just about everywhere.  I'm fortunate to have neighbors with huge stands of them.  They've been there as long as I can remember and must be 15 feet high. Beautiful, ancient stands of them.

The fruit of the prickly pear is called a tuna.  And they are delicious.  They remind me a bit of a melon, but so very sweet.  

But like a lot of things, you have to work to enjoy the goodness.  The fruit and the pads are covered with spines called glochids.  There are lot's of sites that you can google to see how best to navigate the spines, but my advice is 'move slowly'.  When you get in a hurry, that's how you end up with a finger full of needles.  I use tongs, heavy gloves and fire.   You use what you're used to.

But once you have that wonderful fruit, here's a delicious pie you can make with them.  It's not a traditional pie.  It's more like a filled 'dutch baby'.  


Filling:
3.5 cups prickly pear pulp.  (The species near me has small seeds, so I don't worry about seiving them out.  If the species that you are using has large seeds, you might want to remove them.)
1 cup sugar
1 cup water

Mix together in a medium saucepan and bring to a boil.  Simmer until sugar is dissolved.  Set aside.

Pie:
Preheat oven to 425 degrees.
Place 1/4 pound butter in a 13" x 9" baking dish.  Put it in the oven while it is heating.  You want the butter to be sizzling, but do not let it brown.

While the butter is melting, mix together:
In a blender, mix 6 eggs, 1 cup of milk, 1/4 cup orange juice, 1/2 cup sugar, 1 cup all-purpose flour, 1/4 tsp salt.  Blend till frothy.

Remove butter from oven and immediately pour batter into the butter.  Do not stir.  Quickly pour prickly pear filling onto batter.  Do not stir.

Place back into the hot oven for 20 minutes or until puffed and brown.

Serve immediately.

Tuesday, April 2, 2013

Acorn Polenta

I like corn polenta.  It's a comfort food to me.  Cheesy, creamy, I'll use it as a base for vegetables or even grill it.

I'm usually blessed with a fall abundance of acorns so this year I made acorn polenta.

If you can boil water, you can make polenta.  It just takes patience.  And there are a couple of rules.

Start with a rough acorn meal, not an acorn flour.  Also, make sure that you've cold processed the acorns to remove tannins.  Using a hot water method will destroy some of the delicate starches that are needed to make polenta the creamy dish that it is.  Make sure there is not a trace of tannins left in the meal.  This is very important.  Any tannins remaining will become more pronounced as the starches break down and leave you with a bitter dish.

Also, you must stir the polenta for one minute every ten minutes.  Use a heavy bottomed pot and a long wooden spoon.  You must scrape the bottom and sides during your one minute stir-a-thon.    If you don't, you'll end up with a burned pot.

Use 4 parts water to one part meal.  Add the salt prior to adding the meal.  It's too hard to get the salt distributed through the mass of starch otherwise.    Whisk the cornmeal into the boiling water and stir often for the first few minutes.  This will help avoid lumps.

Ready?

Bring 4 cups water to a boil in a heavy pot.  (I used cast iron).  Add 1 teaspoon of salt.  When the pot is boiling hard, gradually whisk in 1 cup of acorn meal.  It's important to go slow when adding the meal and whisk well.  Once you've added all the meal, turn the heat down low.  At a hard boil, the bubbles rising to the surface will burn you with splatter.  You want a gentle heat, enough that the meal simmers, but not boils.  Stir frequently during the first 10 minutes.

Set the timer for 10 minutes.  At the end of 10 minutes, stir, scraping the bottom and sides for one full minute.  Set the time again and repeat for 1 hour to 1.5 hours.

When the polenta is creamy add 1-2 cups of your favorite shredded cheese and 4 tablespoons of butter.  .  I use parmigiana or Gorgonzola and quickly pour into a loaf pan.  Cool and slice.

Serve however you love to serve corn polenta.


Pineapple Weed Infused Angel Food Cake


I've been desperate to infuse a cake with elderflower this year.  But there aren't any elder flowers blooming and probably won't be for several more weeks.

I was planning on making an angel food cake for Easter brunch tomorrow, so I just added the pineapple weed infused sugar that I made last week.  I spooned fresh strawberries on top, but it's just as good plain.

Angel food cake is easy to make, but it does take a dozen eggs.  Luckily, I have chickens that produce more than I can use on a daily basis.  Eggs are easier to separate when still cold from the 'fridge, but beat up nicer when they are at room temperature.  I crack my eggs the night before and whip them in the morning.  Do what works best for you.

The nice thing about angel food is that it's a cake that can go 'gluten-free' without much change in texture.  King Arthur flour has a nice recipe that I've used for my gluten free friends here:

http://www.kingarthurflour.com/recipes/gluten-free-angel-food-cake-recipe

Here's my recipe:

Whisk together 1 cup unbleached flour and 3/4 of a cup of the pineapple weed sugar in a bowl.  In a large bowl mix 12 large egg whites and 1/2 teaspoon salt.  Beat until frothy, then add 1.5 teaspoons of cream of tartar.  Beat until stiff, glossy peaks form, then add another 3/4 of a cup of the pineapple sugar, adding 1/4 cup at a time.


Fold the dry ingredients into the beaten egg whites.  Try to mix as little as possible so as not to break down the 'loft' of the egg whites.

Spoon the batter into an ungreased 10" angel food cake pan and bake in a preheated oven (325 degrees) on the bottom rack.  The cake should be golden brown on top and spring back when you gently press on it.

Place the cake upside down to cool.  If your pan doesn't have legs, put it over the top of a bottle so as not to crush the top.


Let the cake cool for at least an hour and a half.

To remove from the pan, run a spatula along the sides of the pan. Flip it over and it should drop out pretty easily.


Frost your cake if you like or drizzle it with a chocolate sauce or strawberries.