Friday, May 4, 2012

Strawberry Soda, the homemade lacto-fermented way!

Do you remember when Newcastle had a drug store?  I do.  It was next to the library.  Wait, you don't remember the library either?  My mother was the last librarian in Newcastle.
Stay with me here.  I made soda last week.  And as I was bottling it, I remembered my mother taking me to the soda fountain in the Newcastle Drug Store for a lime phosphate soda.
Soda fountains were in pharmacies 'way back then because the sodas were used as delivery mechanisms for  the vitamins and minerals in roots, fruits and vegetables.
Most of those sodas were lacto-fermented.
Which brings us here.
I've been playing with lacto-fermentation.
And I have to say that the experiments have been fun.  In fact, it's less an experiment lately and more a full-blown hobby  :)  I was a little intimidated at first.  I'd always heard stories of exploding bottles and flying glass, but I reigned in those fears and in the process learned to make a really yummy soda.
When I first heard the term 'lacto-fermented', I was a little suspicious.  I'm not really a fan of most fermented foods such as kimchi and sauerkraut.  However, my father used to make sour pickles in big stone crocks down in the cellar and I liked those.  So, I gave it a shot.
Lacto-fermentation occurs when bacteria changes the sugars and starches that are present in fruits and vegetables into lactic acid.  The end product can be spicy, sour, tangy or sweet like this strawberry soda.
But here's the best part; you're drinking soda that is a living food, full of enzymes and pro-biotics.
Instead of using  heat for preservation, the process encourages the proliferation of lactobacilli.  The by-product of this friendly little bacteria is lactic acid which also aids digestion by promoting healthy flora all through the intestines.   There's a whole bunch more science 'stuff' here, like how extra vitamins are added through the fermentation process and how the white sugar gets gobbled up by the bacteria, but the best part is that unlike so many store-bought sodas, this one is actually good for you!
You don't need a lot of equipment.  That was a real clincher for me to try the recipe.  Nothing is more upsetting than to invest in a lot of specialized equipment that I'll never use again if the experiment is a failure.  All I needed was a gallon jar, some bottles and regular pots and pans and measuring spoons.  The soda uses three ingredients:  ginger, sugar and fruit.  I had loads of strawberries in the freezer, left over from the garden last year and with summer coming, I was happy to use them up.  My later experiments used different roots, but for now, lets keep it simple.  To make your 'ginger bug' you'll need:
a ginger root
sugar
a quart jar

Fill the quart jar 3/4 of the way up with pure water.  Don't use chlorinated water.
Add 1 finely chopped tablespoon ginger and two teaspoons sugar.  Stir well.
Cover with a bit of muslin (I use a paint strainer).
Let sit over night.
The next day, add 2 teaspoons of ginger and two teaspoons of sugar.  Do this every morning for a week.
Stir your 'ginger bug' several times a day.

After a week, you should have a brew that's bubbly and smells fresh and clean and gingery.

Now mix up your syrup.  You'll need:
1 cup of the 'ginger bug'
6 cups strawberries (fresh or frozen)  You don't have to use strawberries.  You can mix and match fruits.  Try rhubarb and ginger.  Or lemon and cantalope.  Or even manzanita blossoms!
1 1/2 cups sugar

Bring 1/2 gallon of pure water to a boil.  Add sugar and fruit.  Bring the water back to a boil and simmer for 10 minutes.  Taste it.  Does it taste good?  Remember, this isn't an exact science.  Adjust if you need to by adding fruit to make it 'fruitier'.

Pour the hot mixture into the gallon jar and add pure water almost to the top, then let it cool to room temperature.  Now add the cup of 'ginger bug'.  Don't worry if some of the root gets in the mix.  It won't hurt anything.

Stir well and cover with a bit of cheesecloth.  Leave it on the counter to sit and stir it several times a day.   The longer it sits, the more sugars will be consumed.  I usually let mine sit for about three days.  I like my soda a little sweeter.  But leave it out longer if you like a dryer soda.  It's all up to you.  Don't go longer than 7 days though.

To bottle it, just strain it and pour it into a bottle you can seal.  I invested in flip top bottles, but old sparkling apple juice bottles with corks would work fine too.  Leave the bottles out one day for the fermentation process to continue.   Then put them in the refrigerator.  If you leave them on the counter too long, they could explode.

I haven't had a bottle blow up yet and I've made a ton of these delicious drinks.  But to be on the safe side, I do  put my bottles in a big soup pot with a lid.  If it does blow, the pot will contain the mess.

And be careful when you open them.  I usually open them outside because they can spout just like champagne when they're opened.  No one wants to be cleaning soda off the ceiling!

Pour into a glass with ice and feel proud that you are serving your family something healthy and delicious.  Kind'a like what we used to get at the soda fountain in Newcastle.


Thursday, April 12, 2012

Rain, Cucumbers and Loofahs

It's been wet here.  Really wet.  This is Northern California.  It's not supposed to be this wet.   I thought the spring was going to be a dry one and I've stopped stacking wood, I've changed into the summer curtains and dang it!  I can't get into the woods or the garden.  I was ready for some sunshine!   But ok.  When life gives you lemons... make lemonade.

Well, actually, I made a pot scrubber.

We have a plant called 'wild cucumber' around here.   Actually we have at least two species of  Marah growing.  I've always thought it was such a pretty and interesting vine.  There's something about it's lushness and it's beautiful greenness that screams 'fairy grove' to me.  It seems like it has a bit of magic.

Wild cucumber grows  in really dry places usually.  I find it out on abandoned fences, in old orchards and crawling up grey pines.   It's got this cool, spiny fruit, which is poisonous, actually.


I spied it driving it up my driveway.  I had heard that you could make a nice loofah out of it, but I didn't know how.  I had planned to wait to try it this fall, when the spiky fruit had turned brown, but with all this rain, I needed a project...

So I plucked that thorny little apple.  

And it was thorny!  Really thorny.  I was wishing I had worn gloves.  And I had no idea how I was going to peel it.

So I plopped it in a pot and boiled it for 2 hours.

And guess what?  It was still thorny.  

So I boiled it for another hour.  And still, I needed to don gloves to peel it.  I was rewarded with a few large and beautiful seeds and a very slimy out covering that still managed somehow to be 'poky'.  

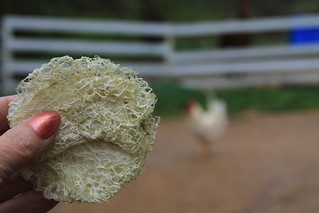
But underneath was this beautiful cellulose structure, just exactly like is found in the loofah gourd!


Now honestly, it's just a tad harsh to use on my skin.  It's really going on 'Brillo Pad' harshness.  But it is perfect for scrubbing pots and pans.

I'm satisfied. 

The house is warm from boiling the cuke for three hours, I was distracted from the rain and I have a nifty pot scrubber.  And I got to use a fairy plant.  Not a bad day on the farm.


Friday, March 23, 2012

Dandelion-Cheese Muffins

I'm not a gourmet cook. I'm more of a camp cook. Give me a bit of cast iron and I can work miracles and not have 50 dishes to wash. That's a priority for me.

If you make nothing else out of wild food try this. It really is good and fairly simple. My best friend refuses to eat wild foods (with the exception of anything with berries or my cherry brandy). But I can slip this one by her and she doesn't notice. (Oh, c'mon. Don't judge.)

They're a beautiful sunny yellow and nice served warm.

Pull any green off of the dandelion flower so that you are left with just petals.

1/2 lb. grated cheddar cheese
3/4 cup dandelion flowers
1 & 3/4 cup sifted flour
2 1/2 tsp. baking powder
1 Tbs. granulated sugar
1/4 tsp salt
1 egg
1 cup milk
3 Tbsp. margarine/butter

Sift dry ingredients together. Stir in cheese and flowers. Beat together egg and milk. Blend into dry ingredients. Fold in margarine/butter. Fill muffin cups 3/4 full. Bake at 350 degrees for 30 minutes.

Monday, March 12, 2012

Do You Know Carmine?

No, the other carmine. The carmine color that comes from an insect called
Cochineal. It's binomial name is Dactylopius coccus.

We use this color called 'carmine' (from the insect) and use it for a lot of
things, but I like it best as a natural food coloring. (Does anyone remember the
health dangers of red #5?) It's used as a dye in many parts of the world (it's
why we call the British 'red coats') and in cosmetics, candies and foods.

I spent the morning harvesting Cochineal off of prickly pear cactus.

It's actually a scale type insect, like you'd find in your garden, and it uses
the prickly pear cactus as it's host. It just looks like a cottony bit of fuzz
located between the needles. Pick it out and squish it between your fingers and
you'll get a carmine colored stain. The stain is caused by carminic acid, which
helps to deter predation by other insects and birds.

I harvest the bits of fluff and now I'll dry them. I'll reconstitute them in
water to use at Easter or in cooking whenever I want to add a red to pink touch
of color.

If you get the chance to read up on the history of this little insect, you
should. It's fascinating.

Wednesday, March 7, 2012

A Wild Rose By Any Other Name

Keep in mind, these id posts are mostly for people who are new to foraging.  Sometimes finding an experienced forager is difficult and this work will help 'newbies' get out and start using id books.    It's
simply a way for you to learn how to use your 'Botany in a Day' books which will
help you when you actually get out foraging.  This doesn't remotely cover all
the uses of the rose, it's just meant to get you looking at the fields as you go
by and get you ready for the field.
I have two species of wild rose around me, the California wild rose (R.
californica) and the dog rose (R. canina).  There are other species of wild rose
found in California, but these two are the most common.

I don't think you'll see many with leaves yet, but look for the thorny canes.
You may find some of last years rose hips still on the canes. Don't get them
confused with native blackberry though.

Here are two Cal-Flora links with pictures:
http://www.calflora.org/cgi-bin/species_query.cgi?where-calrecnum=7180

http://www.calflora.org/cgi-bin/species_query.cgi?where-calrecnum=7179


Memorize the leaf shape. Look at the veination. Look at the family name. This
is a really important group for us foragers.

My earliest memory of the rose is when my mother and I made rose petal beads on
summer. I kept those fragrant beads in my drawer long after the scent was gone.

Rose is an important plant for bird communities.  With the feral cat populations
being so high in our area, wild roses offer a thorny place for birds to avoid
predation.

I found a great variability in the flavor of hips in these wild roses. I think
R. californica tastes better than the R. canina, butthat's really subjective.
And I've found great differences between bushes. So taste here, taste there.
Compare.

The best hips taste like a tart 'fruit roll-up'. Which is what a lot of people
do with them. Puree them with sugar and pour out and dehydrate.

I prefer to make jam out of the hips and use them dried, in baked goods.

I also make an easy wild rose elixer with brandy for winter illnesses. And nest
to orange blossom honey, wild rose honey, spread on buckwheat pancakes is
divine.

I make my own skin cream out of rosewater (I'll post the recipe later this
summer). I just don't buy that expensive stuff at the department store anymore.

And this is my mentor's recipe for rose baKlava. She has a personal affinity
with the Rosa spp (she is named after it). If you look through older posts I
think I have my own recipes posted, but this one is just so good I wanted to
share.

Ingredients

* 1 /2 batch or 1/2 package of phyllo dough
* 1-1.5 C butter roasted Pecans (or similar nut), coarsely ground
* 1 package cream cheese, warmed until soft
* 1-2 sticks melted butter to brush on phyllo dough (more or less depending
on how you feel about butter ;) )
* 1/2 C Wild Rose infused honey (Yes, you can use any Rose infused honey you
like the taste of. This is just standard Rose petal infused honey, you can even
leave the petals in the honey if you like the texture rather than straining them
out). You may want more honey than this. I don't care for very sweet desserts,
so if you have a serious sweet tooth, you'll want to adjust for that.
* 1-2 Tbs Rose water (optional)
* 1 Tbs Orange zest, finely chopped
* 1 Tsp Cinnamon
* 1 Tsp Vanilla extract
* 1/2 Tsp freshly ground Black Pepper
* 1/2 Tsp Cardamom
* 1-2 Tsp salt

Instructions

1. Pre-heat oven to 300 F
2. Butter a square baking pan
3. In a mixing bowl combine nuts, rose water, orange zest, vanilla, salt, all
spices and 1/4 C Rose infused honey. If you're using fresh Rose infused honey
then the honey should be thin enough to pour and mix well. If you used dry
petals, you may need to warm it in order to mix it.
4. Fold in cream cheese.
5. Blend until smooth. Add more spices etc., to taste. Then set aside
6. If using packaged phyllo dough, remove dough from package and cut appr.
in half or a little larger than your pan. Wrap one half in damp cloth or similar
and return to a cool place.
7. Begin laying the sheets of phyllo dough, one at a time, brushing butter
over each layer as you go. If your sheets of dough are somewhat rectangular even
after cutting in half (this is normal), just layer it so that you rotate how you
lay the long side in the pan so it ends up fairly even. Layer half of the phyllo
dough.
8. Spread the nut/spice/honey mixture evenly over the sheets.
9. Cover with remaining phyllo dough sheets, remembering to butter between
each layer.
10. With a very sharp knife, cut diagonal parallel lines about 2 inches apart
in diamond shapes. Be sure to cut all the way to the bottom.
11. At this point, I often add more butter by pouring some into the cut areas.
12. Of course most people bake their baklava in their oven. However, it was
way too hot in our cabin to have the woodstove going so I cooked mine by putting
the baking pan inside in a large cast iron pan with a pot lid over it and cooked
it on the propane stovetop over low heat for about 45 min. It worked great, and
I just browned the top by warming each piece in a pan face down before serving.
Most of my readers probably won't want to mess with my elaborate parlor tricks,
so just figure baking in the oven for about 30-45 min at 300 F or until golden
brown.
13. Then pour remaining Rose honey over the top of the still warm baklava and
let it soak in a bit before serving.
14. Top with whipped cream or ice cream as you like.


Sunday, March 4, 2012

Marshmallow Soup

Since we're working on 'easy' identification, I just wanted to send out this video. The video was made by Sunny Savage (a popular hipster vlogger) interviewing Dr. John Kallas. I've a book or two of John's on the shelf and I enjoy that he makes science easy and fun to read. I wish more folks had his talent. Mallows are a popular medicine plant. They're soothing and mucilaginous and good for (among other things) sore throats and coughs. We learned how to make a yummy delivery system for their medicinal magic a few centuries back, and it came in the form of a sweet we now call a 'marshmallow'. Marshmallows were traditionally made from the plant Althea officinalis, but we can get a pretty good substitute in our own yards. Although Sunny doesn't state it in the video, I believe they are using Malva neglecta, a common little weed in our neck of the woods. We also have a lot of M. parviflora around, and they can be used interchangeably. I think most of you will recognize it easily enough. Although John calls it's fruit a 'pea', it's actually a shizocarp. I try to make it easy to remember plants so I often call the plant a 'cheese plant' because the fruit is often described as resembling tiny cheese wheels. I have taken John's recipe a few steps farther, and borrowing an idea from Euell Gibbons, use the mallow cream as a base in cream pies for vegan friends. It's turned out nicely. The drawback is that it takes a good long while to gather enough 'wheels'. (I had the good fortune to work as a fire look out one summer. It taught me endless patience. I may be the only person on the planet that's picked enough berries to make a grouse whortleberry pie.) This year, I plan on experimenting more with the root to see if it will give me that nice thickening quality. As in my prior post, if you find Malva neglecta and want to try some recipes (it's a bit early to find them fruiting yet) simply post a clear picture and we can help you make sure of identification. And be sure to look up the flower, leaf parts and family in 'Botany in a Day' and memorize them. Here is the Dr. Kallas video: http://www.youtube.com/watch?v=bdGAUejE8BM Here is the CalFlora page for M. neglecta (just to help with id): http://www.calflora.org/cgi-bin/species_query.cgi?where-calrecnum=5352 If you want to see more of them, here is Feral Kevin's video: http://www.youtube.com/watch?v=ZdLxvPK0MHU Malva is a highly nutritious plant and contain calcium and magnesium, potassium, iron, selenium, and pre-cursers for vitamins A and C. Try young leaves added to salads, but some people don't like the 'slimy' feel of the leaves in their mouths. Linda Runyun dries the leaves, grinds them up and combines the powder with other flours for a nutritional boost. I've used the leaves to make 'Leafu' (see early in the archives to make this high protein tofu substitute). If any of you are familiar with Henrietta Kress, this is her recipe for Mallow Soup. (If you're not, I highly suggest her site, 'Henrietta"s Herbal'.) It's pretty good, certainly cheap to make, and reminds me of my mother-in-laws 'diet soup'. There are a number of 'ancient' recipes on line that I want to try, too. Mallow Soup (serves 6 - 8) 1 large onion 1 large tomato 2 bell peppers, preferable of different colors ½ bunch of celery 4 carrots 3 large potatoes 3 garlic cloves olive oil to cover the bottom of your soup kettle 6 cups of water, enriched with 2 Tblsp. of good-quality soy sauce or the same quantity of chicken broth 2 tsp. salt plus black pepper to taste. 2 large handfuls of clean mallow leaves and/or roots 1. Dice the onion; chop tomato, peppers, celery, carrots and potatoes. 2. Sauté the onions, adding the other vegetables as the onions start to wilt 3. Chop the garlic finely; add to the sautéed vegetables when they are looking golden and start smelling cooked. 4. Add water and seasonings; simmer for 15-20 minutes. A nice touch at this point is to blend the cooked vegetables, with some of the soup, and return the blended mass to the pot. Children especially appreciate blended soups. 5. Chop the Mallow into narrow ribbons: if using roots, slice finely. Add to the pot and cook a further 10 minutes. Serve with croutons, or chopped parsley, or simply on its own. Medicinally, my mentor Kiva Rose says: "Malva neglecta is an amazing tonic used across world to nourish the vital fluids of the body and to cool heat from inflammation and infection, it can also gently support your immune system, building your resistance to stress and infectious disease. It is among the best and most widely used medicines in the world." The tea is soothing to a dry, hacking cough and a cup a day is said to ward off lithic buildup (kidney stones). Mallow is one of those herbs that do so much, I just can't cover it all here. So there you have it. You should be busy for awhile, yes?

Saturday, March 3, 2012

Instant Gratification

OK. I've been wracking my brain trying to think of a way for some of you absolute newbies to get started foraging. So, if you want to play along, try this. If you don't, that's fine. Let's start by looking for one of my favorite little weeds. Oh, it's not a plant that will nourish you if you are starving to death. Nutritionally, it's not a powerhouse. It doesn't really have a lot of edible uses (although I'm working on an ice cream version!). But it is sort of sweet and yummy and one of my favorite ways to relax. My mother used to pick this and make me tea when I was a child. Steep it for 10 minutes in fresh, clean boiled water and add the sweetener of your choice, if you want. It's a very common weed called pineapple weed. The scientific name is Matricaria discoidea and it's very easy to identify. You usually find it in dry, miserable, disturbed soil. Below, I've listed a several links to many pictures. Look for the plant in your yards and driveways (as always, keep in mind what the surrounding area is like. You want to stay away from plants that have been chemically sprayed. Use some common sense. There have been instances where people who allergic to plants in the Aster family are also allergic to this plant) When you find it, post a picture in the album so we can give you a positive id. Please poet decent pictures, not blurry ones. I use the weed by steeping it in hot water and adding a bit of sweetener. It is much like chamomile (and in fact is known as 'wild chamomile') in the sense that it is relaxing and soothing. It's also terrific iced. Here are some pictures and info: http://www.calflora.org/cgi-bin/species_query.cgi?where-calrecnum=11825 http://www.calflora.org/cgi-bin/species_query.cgi?where-calrecnum=11825 http://www.calflora.org/cgi-bin/species_query.cgi?where-calrecnum=11825 Pineapple weed leaves are pinnately dissected. There is a very distinct sweet 'pineappley' odor when you pinch the leaves. My experience with the plant here in California is that at the first hint of summer heat, it disappears. Now get out your 'Botany in a Day' book. Identify the leaf type, the flower type, and learn about the family. Memorize the Latin name. (I cannot emphasize enough to begin to commit the Latin nomenclature to memory. You will find out very quickly that common names are confusing and sometimes dangerous.) It's not rocket science. I used to use homemade flashcards, but then, I'm..uh...wound a bit tight. :o) Some people rub the leaves on their skin to work as an insect repellent. Herbally, my refrences say: Pineapple weed has been used in folk medicine for centuries. The name matricaria is derived from the Latin matrix (uterus), and camomiles have been used for a host of gynaecological disorders. Other uses for pineapple weed have been as a sedative, an anti-inflammatory, an antispasmodic and an anthelmintic. Another constituent is the coumarin herniarin, which has shown a range of biological activities, including haemostatic and anthelmintic properties. Research has also demonstrated antimicrobial activity, with extracts of pineapple weed causing inhibition of aggregation of Escherichia coli cells in vitro. As a treatment for diarrhea, the whole plant was decocted. It is similar to chamomile in many of its medicinal qualities but much milder. It is used for stomachaches, flatulence, as a mild relaxant and for colds and menstrual problems. Externally it can be used for itching and sores. A lot of people dry this herb, but frankly, it seems like a lot of trouble for me since I have regualar chamomile growing in my garden. It's just that regualar chamomile doesn't have the 'sweetness' of pineapple weed. So your choice. So there ya go. Let's see if this works. At least it's a place to start.